A Form Filler Help v3.5.4
Release your inner geek! A Form Filler takes a few minutes to learn, but that won't be much compared to the hours and hours of time you'll save in the years to come no longer needing to deal with annoying windows.
1. An Overview of how A Form Filler works
2. Main Window
3. Add/Change Window
4. Options Window
5. About Window
6. A Form Filler's systray icon
7. Running A Form Filler with administrative privileges
to control more forms
8. Real Life Examples
8.1 How to: Respond to annoying prompts and pop-ups
8.2 How to: Fill in a password window
8.3 How to: Deal with more complex forms

1. An Overview of how A Form Filler works
A Form Filler is actually made up of two parts, one you see and one you don't. The one you see allows you to setup and control windows being monitored and actioned, and the one you don't see works in the background to do the monitoring and actioning.
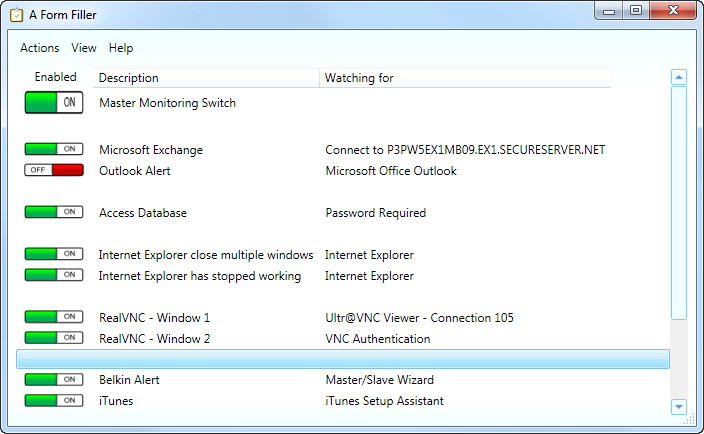
Double clicking the A Form Filler icon on your desktop, or in your Windows - Start - Programs - A Form Filler folder, causes the A Form Filler main window to appear (this is the program you see). Here is what the main window looks like:
The part you don't see is started automatically when you log onto Windows.
While this part does not appear as a window on your screen, it does appears as an icon in your systray (usually found at the bottom right hand side of your screen, near your system clock).
The main window allows you to add, change and removed windows to be monitored.
It also allows you to arrange/organize the order of windows to be monitored, as well as the information displayed about them on the main window.
From the main window you can toggle on and off the monitoring windows all at once or individually.
A Master Control Switch allows you to toggle on and off all monitoring, simply clicking the on/off switch to make this happen. When you toggle the Master Control Switch 'off' all monitoring is paused. When you toggle the Master Switch 'on' all individual windows which were being individual monitored the last time the switch was turned on will be turned on once again.
Monitoring of individual windows can be turned on and off by clicking their associated switches.
From the Main Window you can also open up: an options window, help, the A Form Filler web site, and an About window.
The menu bar on the main window lets you select commands under the headings Action, View, and Help. These are as follows:
Actions - Add, Action - Change, and Action - Remove : To add, change or remove a window to be monitored.
Actions - Move up, Action - Move down, Action - Insert a blank line : To move rows on the Main Window up, down and to insert a blank line between them.
Actions - Switch on/off : to change the switch of the currently selected row
Actions - Undo : to undo your last command
Actions - Options : to bring up the options window
Actions - Run with (/without) administrator privileges : automatically restart A Form Filler with (/or without) administrator privileges. Running A Form Filler with administrative privileges allows it to interact with more types of windows.
Actions - Exit : To exit A From Filler and stop all processing. To close the Main Window and allow A Form Filler to continue to monitor for forms to be filled out, just click on the red "X" in the top right hand corner of the screen.
View - Description, View - Watching for, View - Keys to send : click these options to view their corresponding columns in the main window.
Help - Help : to view this page
Help - Webpage : to view the A Form Filler main internet web page.
Help - Donate : Brings up the A Form Filler donation internet web page.
Help - About : To view the About window, which tells you the version of A Form Filler you are running, as well as information about shareware, the A Form Filler Licensing Agreement.
Please note, options that don't make sense in context, for example moving a row down when it is already the last row on the screen, will be disabled.
Of note, the Remove command doesn't have a confirmation prompt. Rather, if you remove something by mistake just click Action - Undo to restore it.
Allows you to Add / Change a window to be monitored and the keystrokes to be sent to in. Here is what the Add/Change window looks like:

The following information is captured and displayed on the Add/Change window:
1. A 'Description', which is a way for you to describe the window to be monitored and acted upon,
2. The 'Watch for' field (which you can either select via a drop down box or type in) which tells A Form Filler the window to watch for,
If the window you want to watch for is currently on the screen, click the drop down box arrow to bring up a list of all windows on the screen. The list will contain the title of each window, or when no title exists the text from within the window.
Simply click on the window you want to watch for from the drop down list. When you do this a green line will appear under the 'Watch for' field. This green line signifies that A Form Filler has assigned a signature to the window which helps it distinguish this window from others with the same title.
If the window you want to watch for is currently is not on the screen but you know its window title, just type the window title that will appear when the window does show up. A Form Filler will then watch for this window by title. Note: the window title is found in the top boarder of the window, to the right of the application icon. For example, the A Form Filler - Add/Change window show above has a window title of "A Form Filler - Add/Change" (without the quotes).
If you type the title of the window, instead of picking it from the drop down box, A Form Filler will action any window with that window title. When you type the name of the window the green line does not appear under the 'Watch for' drop down box and A From Filler will not distinguish different windows with that same title, rather it will action them all in the same way.
If you want to a single processing rule for all windows having a similar starting to their title but different ending to their title then you can end the 'watch for' title name with a wildcard indicator. The wildcard indicator is "[*]" (without the quotes). For example: "My App - Warning[*]" (without the quotes) can be used to define a common rule (such as simply sending the {ENTER} key) for all Window titles starting with "My App - Warning".
3. the 'Keys to send' field which contains the keys you want to sent to the window once it appears.
You can either type into the 'Keys to send' field the keys you would like sent to the window once it appears, or you can simply press the 'Record' button to have A Form Filler automatically fill in this information for you as you type it in yourself to the actual window (more information below).
Here is a list of the keys codes you can use:
| Key | Code | Key | Code |
 |
| A to Z | A to Z | Backspace | {BACKSPACE}, {BS}, or {BKSP} | |
| a to Z | a to z | Break | {BREAK} | |
| 0 to 9 | 0 to 9 | Caps Lock | {CAPSLOCK} | |
| !@#$*_ |:"<>?`- =[]\;',./ |
!@#$*_ |:"<>?`- =[]\;',./ |
Del | {DEL} | |
| Delete | {DELETE} | |||
| Down Arrow | {DOWN} | |||
| + | {+} | End | {END} | |
| ^ | {^} | Enter | {ENTER} | |
| % | {%} | Esc or Escape | {ESC} | |
| ~ | {~} | F1 to F12 | {F1} to {F12} | |
| { | {{} | Help | {HELP} | |
| } | {}} | Home | {HOME} | |
| Numpad + | {ADD} | INS | {INS} | |
| Numpad - | {SUBTRACT} | INSERT | {INSERT} | |
| Numpad * | {MULTIPLY} | Left Arrow | {LEFT} | |
| Numpad / | {DIVIDE} | Num Lock | {NUMLOCK} | |
| Spacebar | a space, i.e. " " (without the quotes) or {SPACE} |
Page Down | {PGDN} | |
| Page Up | {PGUP} | |||
| Print Screen | {PRTSC} | |||
| Right Arrow | {RIGHT} | |||
| Scroll Lock | {SCROLLLOCK} | |||
| Tab | {TAB} | |||
| Up Arrow | {UP} | |||
| 1/4 second pause | {!} | |||
| To specify keys combined with any combination of the SHIFT, CTRL, and ALT keys, precede the key code with one or more of the following codes: | ||||
| SHIFT | + | |||
| CTRL | ^ | |||
| ALT | % | |||
| For example ^C represents pressing the CTRL and 'C' keys together at the same time. | ||||
| You can also have A Form Filler automatically fill
in the current date and time, using the following command: {DATETIME format codes } for more information please click here |
||||
| TIP for check boxes and radio
buttons: If you have a check box or radio button on your form which you want to toggle, it may be possible to {TAB} over to that control, and then send a space to it in order to toggle it. |
||||
A Form Filler can also review a form for matching text in order to determine if the form will be processed or not.
| To do this, one of the two following commands may be placed at
the very beginning of the 'Keys to send' instruction line: {Must Contain "xxxx"} or {Must Not Contain "xxxx"} For example if you put the following in the 'Key to send' field: {Must Contain "grover@sesamestreet.com"}{TAB}password{ENTER} then the form will only be processed if it contains a simple text box or a drop down box having a default value of grover@seasamestreet.com The text to be matched ( grover@sesamestreet.com in the example above) is case sensitive. Of note: not all content on a form can be matched against. In general however, most static parts of the form (for example: the form's title, button names, and label names) can usually be matched against. Other parts of the form that can change, such as where free form text is entered, may be matched on. It all depends on how the form was built by the people who built it. |
| TIP for coding {Must Contain "xxx"} and {Must Not
Contain "xxx"} : In order to better support accessibility some programs allow you to press the ALT key and then select an unique underlined letter on the active form in order to more easily select a radio box, check box, or menu item. For example, there may be a check box on your form that reads: [] save file on exit but when you press the ALT key this changes to: [] save file on exit (with an underline under the 'f'). If this is the case on your form and you only what A Form Filler to react to it if it contains the words "save file on exit", then rather than coding: {Must Contain "save file on exit"} you may need to code either: {Must Contain "save &file on exit"} or {Must Contain "save _file on exit"} This will depend on the programming language the program you are running was built with. Accordingly you may have to experiment with this a bit if the Must Contain or Must Not Contain feature doesn't seem to be working as you might have otherwise expected. |
A Form Filler allows you to record your keystrokes in another application and have them automatically entered into the 'Keys to send' field. To do this simply click the record button. When you click it the button name will change from 'Record' to 'Recording' and any keystrokes you enter into any other application will be recorded in the 'Keys to send' field. When you are done recording just click the 'Recording' button to stop all recording.
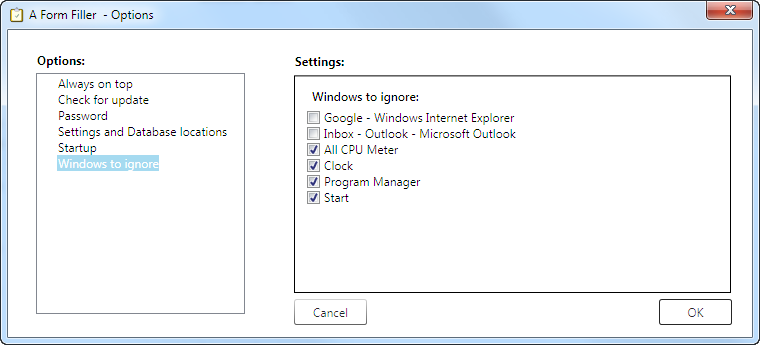
Options are set by first clicking Action - Options. Options you can set are:
Always on top : keeps A Form Filler as your top most window
Check for update : to have A Form Filler automatically check for program updates (you can set the frequency), you can also check for an update immediately by clicking on the button 'Check for Update Now'
Password : Here you can add, change and remove a password. You may chose to do add a password if you want to keep the 'keys to send' protected from prying eyes; for example if you use A Form Filler to automatically fill in the password windows of other applications. Also, if you add a password, your A Form Filler will always ask for it, even if your database is copied from one PC to another. Of note, whether you use a password or not your 'keys to send' information will be stored in an encrypted format in the database.
There is also an option to delay asking for the password until it is needed. If this option is checked, A Form Filler will only ask you for your password when it is needed. That is to say, if you have the option checked to open the main menu at start up then A Form Filler will ask you for your password at start up. However if you do not have the option checked to open the main menu at start up, then A Form Filler will automatically prompt you for a password only after a form to fill out appears.
Settings and Database locations : Behind the scenes A Form Filler keeps two files. The first is a settings file; which contains all your options. The second is a database file; which contains all the information about the windows A Form Filler will watch for and how to handle them. The location of these two files can be viewed by clicking on 'Settings and database locations'. These locations are not changeable. They are however shown on this window to allow you to know where they are should you wish to back them up.
Startup : There is an option to automatically start A From Filler (on by default) when you log on to Windows, as well as to automatically show the main window when the program starts. If you select the option to automatically show the main window when the program starts and you have a password set, you will first need to enter your password before the main window will appear. Also you may select to start the program, by default, with administrator privileges; A Form Filler can interact with more form types when run with administrator privileges.
Windows to ignore : by default A Form Filler will display all windows on your screen in the Add/Change windows 'Watch for' drop down box. To have specific windows ignored, for example the 'Clock' window, just but a check beside it (as illustrated in the screen shot below).
Here is what the options window looks like:
Clicking on 'Help - About' from the Main Window opens the A Form Filler - About window, here is what it looks like for a registered user:
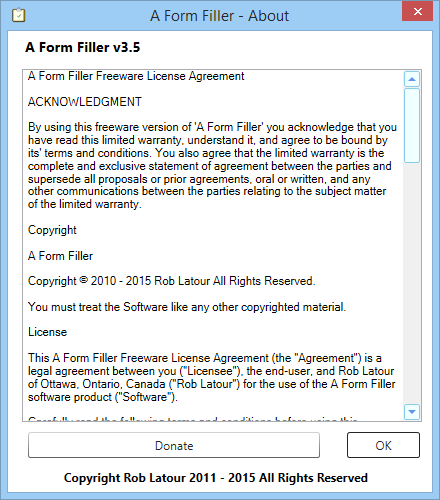
While A Form Filler is being trialed, the About Window says how many days are remaining in the trial.
6. A Form Filler's sytray icon
When A Form Filler is running an icon can be found in your systray (the area of your screen, normaly a the bottom right hand side, near your system clock).
While A Form Filler is paused the icon will be red. While paused A From Filler will not fill out any forms nor ask you for your password.
While A Form Filler is waiting for a password the icon will be orange. While waiting for your password A Form Filler will not fill out any forms.
While running normal, the A Form Filler icon will appear in your systray and forms will be automatically filled out.
Right clicking on the systray icon provides the following four options:
Enter Password - which allows you to enter your password
Show A Form Filler - which will show the main window
Pause - which allows you to pause / un-pause processing. When paused the systray icon will be red, you will see a checkmark beside the word 'Pause' in the systray icon, and the main window's master control switch will show as being 'Off'. When not paused the systray icon will be either normal or orange (if A Form Filler is waiting for a password), you will not see a checkmark beside the word 'Pause' in the systray icon, and the main window's master control switch will show as being 'On'.
Exit - which will exit A Form Filler (and thereby stop future processing)
Double clicking on the systray icon will show the
password window (if A Form Filler is waiting for a Password) followed by the main
window, or just the main window if you have already entered your password.
7. Running with administrative privileges to control more forms:
A Form Filler may need to be started using the Windows 'Run as administrator' option for it to work with some forms; such as those related to another program running with Administrative priviledges or password prompts forms.
To start A Form Filler using the Windows 'Run as administrator' option:
exit A Form Filler if it is running,
right click on the A Form Filler icon on your screen,
click on the 'Run as administrator' option, and
accept (click 'Yes') to the Windows
User Access Security prompt.
8.1 How to: Respond to annoying prompts and pop-ups
8.2 How to: Fill in a password window
8.3 How to: Deal with more complex forms